Saturday, March 19, 2011

Installing Ubuntu inside Windows using VirtualBox

Installing Ubuntu inside Windows using VirtualBox

1. My new experiment about Ubuntu installation inside the windows using virtual box. ( Would you like compare with Vmware server over the oracle Virtual box)

Introduction

2.VirtualBox allows you to run an entire operating system inside another operating system. Please be aware that you should have a minimum of 512 MB of RAM. 1 GB of RAM or more is recommended.

Comparison to Dual-Boot

3.Many websites (including the one you're reading) have tutorials on setting up dual-boots between Windows and Ubuntu. A dual-boot allows you, at boot time, to decide which operating system you want to use. Installing Ubuntu on a virtual machine inside of Windows has a lot advantages over a dual-boot (but also a few disadvantages).

Advantages of virtual installation

  • The size of the installation doesn't have to be predetermined. It can be a dynamically resized virtual hard drive.
  • You do not need to reboot in order to switch between Ubuntu and Windows.
  • The virtual machine will use your Windows internet connection, so you don't have to worry about Ubuntu not detecting your wireless card, if you have one.
  • The virtual machine will set up its own video configuration, so you don't have to worry about installing proprietary graphics drivers to get a reasonable screen resolution.
  • You always have Windows to fall back on in case there are any problems. All you have to do is press the right Control key instead of rebooting your entire computer.
  • For troubleshooting purposes, you can easily take screenshots of any part of Ubuntu (including the boot menu or the login screen).
  • It's low commitment. If you later decide you don't like Ubuntu, all you have to do is delete the virtual hard drive and uninstall VirtualBox.
Disadvantages of virtual installation
  • In order to get any kind of decent performance, you need at least 512 MB of RAM, because you are running an entire operating system (Ubuntu) inside another entire operating system (Windows). The more memory, the better. I would recommend at least 1 GB of RAM.
  • Even though the low commitment factor can seem like an advantage at first, if you later decide you want to switch to Ubuntu and ditch Windows completely, you cannot simply delete your Windows partition. You would have to find some way to migrate out your settings from the virtual machine and then install Ubuntu over Windows outside the virtual machine.
  • Every time you want to use Ubuntu, you have to wait for two boot times (the time it takes to boot Windows, and then the time it takes to boot Ubuntu within Windows).
Installation Process

The first thing you have to do is obtain VirtualBox. Visit the VirtualBox website's download page.You can call the machine whatever you want. If you're installing Ubuntu, it makes sense to call it Ubuntu, I guess. You should also specify that the operating system is Linux.

Follow these instructions to get a Ubuntu disk image (.iso file).


After you launch VirtualBox from the Windows Start menu, click on New to create a new virtual machine. When the New Virtual Machine Wizard appears, click Next.


You can call the machine whatever you want. If you're installing Ubuntu, it makes sense to call it Ubuntu, I guess. You should also specify that the operating system is Linux.


VirtualBox will try to guess how much of your memory (or RAM) to allocate for the virtual machine. If you have 1 GB or less of RAM, I would advise you stick with the recommendation. If, however, you have over 1 GB, about a quarter your RAM or less should be fine. For example, if you have 2 GB of RAM, 512 MB is fine to allocate. If you have 4 GB of RAM, 1 GB is fine to allocate. If you have no idea what RAM is or how much of it you have, just go with the default.

Click Next.


If this is your first time using VirtualBox (which it probably is if you need a tutorial on how to use it), then you do want to Create new hard disk and then click Next.


Click Next again.


Theoretically, a dynamically expanding virtual hard drive is best, because it'll take up only what you actually use. I have come upon weird situations, though, when installing new software in a virtualized Ubuntu, in which the virtual hard drive just fills up instead of expanding. So I would actually recommend picking a Fixed-size storage.


Ubuntu's default installation is less than 4 GB. If you plan on adding software or downloading large files in your virtualized UBuntu, you should tack on some buffer.


Click Finish and wait for the virtual hard drive to be created. This is actually just a very large file that lives inside of your Windows installation.


Click Finish


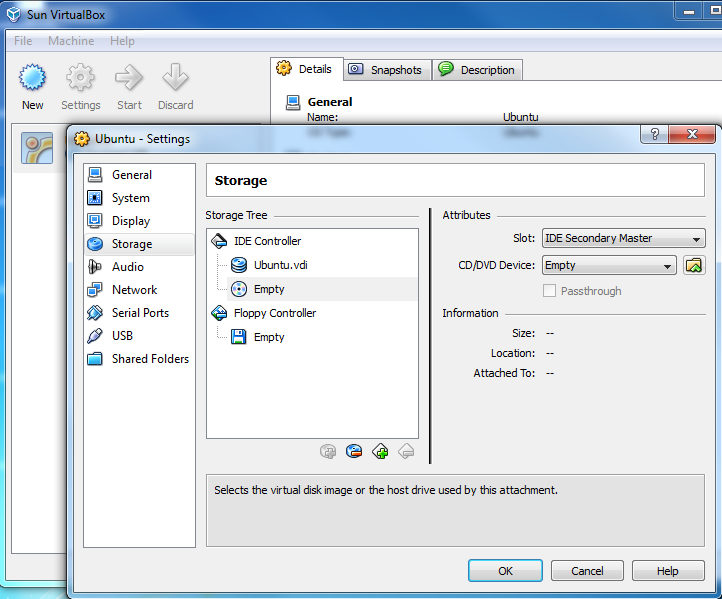
The next thing to do to make the (currently blank) virtual hard drive useful is to add the downloaded Ubuntu disk image (the .iso) boot on your virtual machine. Click on Settings and Storage. Then, under CD/DVD Device, next to Empty, you'll see a little folder icon. Click that, and you can select the Ubuntu .iso you downloaded earlier.


Once you've selected it, click OK.

Then double-click your virtual machine to start it up.


Once it's started up, just follow the regular installation procedure as if you were installing Ubuntu on a real hard drive (instead of a virtual one).


Afterwards, in order to use your virtualized installation (instead of continually booting the live CD), you have to change the CD/DVD Device entry to be Empty again.

Friday, January 7, 2011

Enable and Disable Ubuntu Root Password

Ubuntu is one of the few Linux distributions out there that will not enable the root account.If you want to do something with root permission on the console you have to type sudo before the command.

sudo” means superuser do. “sudo” will prompt for “Password:”. Please specify user password.

As you have noticed during the Ubuntu installation there was no question about the root password, as you might have been used to see during other Linux distribution installation process.Because of this your root accout is inactive.

If you want to enable root account (which is not recommended) enter the following command.

$sudo passwd root

This will prompt for a new root password and once you confirm it, you can start using the root account to login.

If you want to disable root account in ubuntu you need to lock the root account by using the following command

$sudo passwd -l root

If you want to work on a root console you’d better use the following command

$sudo -i


Saturday, May 22, 2010

Ubuntu 9.10 looks like Mac OS X Leopard (compiz + cairo dock + gtk/metacity themes)

3 Steps Beatiful to Make Ubuntu 9.10(Karmic) looks like Mac OS X


Steps1: Option1: Installing gnome-art,an application for managing the splash screens of the GNOME desktop.Go to Applications->Ubuntu Software Center,search and install “art manager”(without quotes).Once installation finish,launch this from System->Preferences->Art Manager,or type “gnome-art”(without quotes) in terminal. NextOption2:Unfortunately,gnome-art is not maintained any longer,and this doesn’t work for my ubuntu! So We installed Gnome-Art NextGen instead.download deb package from this pageUse this command to install(open terminal from Applications/Accessories/Terminal to run command),or double click to install:
sudo dpkg -i name
and we installed i386 deb package in my amd64 machine:
sudo dpkg -i --force-architecture gnomeartng-0.6.0-all.deb
Now,launch Gnome-Art NextGen by typing “gnomeartng”(without quotes) in terminal.


Step2:Install window border theme.


If installed gnome-art,navigate to Art Manager -> Art-> Desktop Themes -> Window Border,and choose theme “Metativo”(you can choose one as you like.)


For Gnome-Art NextGen:In Window Decoration tab,choose one theme.


Step3:Install cairo-dock,and use this replace gnome-panel.In Applications->Ubuntu software center,search and install “cairo-dock” (without quotes).Then,run this in terminal:
gconf-editor
navigate to desktop->gnome->session->required_component.In right box,double click “panel” and change its value to “cairo-dock”


Now,logout and backin,enjoy!

Tuesday, October 13, 2009

how to connect internet in UBUNTU


Connecting to the Internet
Basic Procedure
This section describes the basic procedure for connecting to the Internet.

If you have a wireless connection or connect to the Internet through a modem (including an ADSL modem), and this section does not work, you should read the section called “Wireless Cards” or the section called “ADSL Connections”.
To connect to the Internet:


1. Open System → Administration → Networking.
2. Select the connection you wish to use, then click Properties.
3. Ensure Enable this connection is turned on.
4. If your ISP or network administrator has given you an IP address, set Configuration to Static IP address, then enter the address in the IP address field and click OK. Otherwise, set Configuration to DHCP and click OK.
5. To activate or deactivate network connections, select your connection, then click Activate/Deactivate.


Wireless Cards


Many wireless cards are automatically detected by Ubuntu during installation. To see if your card is supported, open System → Administration → Networking. If your wireless card is listed, you can follow the section called “Basic Procedure” to connect to the Internet. A complete listing of wireless cards which work with Ubuntu can be found online at the Ubuntu Wiki. Please add your wireless card to the list if it works with Ubuntu.


If your wireless network is protected by WEP encryption, ensure that you specify your network password when configuring your connection. Ubuntu does not automatically support WPA encryption, if you require this, there is a WPA guide on the Ubuntu documentation wiki.
Unsupported Wireless Cards
Some cards may not work automatically with Ubuntu. If this is the case, please look at the Wireless Troubleshooting Guide on the Ubuntu Wiki which is an excellent resource for troubleshooting wireless cards.
If your wireless card does not work with Ubuntu, you may have to do some research in order to activate it. A relatively reliable way of getting a wireless card to work is to use the ndiswrapper tool which allows Ubuntu to use the Microsoft Windows driver for the wireless card. To do this, follow the instructions below in the section called “Windows Wireless Drivers”.
All other information regarding wireless networking on Ubuntu is collected at Wireless Networking Central on the Ubuntu Wiki.
Windows Wireless Drivers
Even if your wireless network card does not have a native Linux driver, you may still be able to get it working with ndiswrapper. Ndiswrapper is a Linux module which allows Ubuntu to use the Windows driver for wireless cards (in most cases).

These instructions apply only to the x86 and AMD64 versions of Ubuntu, and not to Ubuntu for Power PC (PPC).

If you have access to the Internet, you can see if your wireless cards is in the list of cards supported by ndiswrapper on the ndiswrapper website.
To install ndiswrapper, install the package ndiswrapper-utils (see Add Applications). This package is provided on the Ubuntu CD. If you have access to the Internet, you can also optionally install a graphical tool, ndisgtk from the Universe repository (see ../../add-applications/C/#extra-repositories).
In order to set up ndiswrapper, it is necessary to obtain the Windows driver for your wireless card. Generally, the best way to do this is from the CD supplied with your wireless card. You should copy two files to the same place on your computer, one ending in .SYS and one ending in .INF. If you find any files which end in .BIN, also copy those. If you are not able to find the right files, and have alternative access to the Internet, you may be able to obtain help from the ndiswrapper website.
If you have installed the graphical tool ndisgtk, to set up ndiswrapper, simply select System → Administration → Windows Wireless Drivers from the menu, and follow the instructions given.
If you have not installed the graphical tool, use this procedure:
1. Open Applications → Accessories → Terminal and type:


sudo ndiswrapper -i ~/Desktop/drivername.inf


The above command assumes that your .INF file is named drivername.inf and was copied to your Desktop. Replace these values if necessary.


2. To check if it is working correctly, type:

ndiswrapper -l
If it is working correctly, you should see:

Installed ndis drivers:
{name of driver} driver present, hardware present
3. For ndiswrapper to function, you need to load a module. To do this, type:

sudo depmod -a
sudo modprobe ndiswrapper
4. To ensure that the module is loaded each time you boot the computer, type:

sudo ndiswrapper -m

You should now be able to connect to the Internet by following the instructions at the section called “Basic Procedure”.


ADSL Connections


All PPPoE and router-style ADSL modems that use an Ethernet connection are supported by Ubuntu, and some USB ADSL modems are supported too.
For a router-style ADSL modem, simply follow the section called “Basic Procedure”
For information on setting up a PPPoE ADSL modem see the section called “PPPoE Modems”.
For information on setting up a USB ADSL modem see the section called “USB ADSL Modems”.


PPPoE Modems


This section is about setting up an ADSL Internet connection using an ethernet PPPoE modem.
You will need to have subscribed to an Internet Service Provider, and your Internet connection must be installed and functional. A "DSL" light on your modem usually shows that the line is synchronized.
You will need your username and password for the account. You must also have an ethernet card connected to your PPPoE modem with the correct type of cable.
Finally, you need the PPPoE package to be installed in order for the following command to work. This package is installed by default, but can be missing if the configuration has been changed. If the following command does not work, you will need to install this package, which can be found on the Ubuntu CD.
To set up the modem:
1.Open Applications → Accessories → Terminal
2. In the terminal type:

sudo pppoeconf
3. A text-based menu program will guide you through the next steps, which are:
1. Confirm that your Ethernet card is detected.
2.. Enter your username.
3. Enter your password.
4. If you already have a PPPoE Connection configured, you will be asked if it may be modified.
5. Popular options: you are asked if you want the “noauth” and “defaultroute” options and to remove “nodetach” - choose Yes.
6. Use peer DNS - choose Yes.
7. Limited MSS problem - choose Yes.
8. When you are asked if you want to connect at start up, you will probably want to say yes.
9. Finally you are asked if you want to establish the connection immediately.
4. Once you have finished these steps, your connection should be working.
To start your ADSL connection on demand, in a terminal type:

sudo pon dsl-provider
To stop your ADSL connection, in a terminal type:

sudo poff dsl-provider


USB ADSL Modems


Often parts of ADSL USB modem drivers are proprietary, closed source software, with a restrictive licence, and so the whole driver cannot be supplied with Ubuntu. To get a modem to work with these drivers, you will need to download files from Internet with a computer having a working connection, then transfer the downloaded files to you Ubuntu installation.

USB is far from the ideal medium for network access, if you have a modem that can connect both via USB and ethernet or a ethernet router, you should use the ethernet connection instead of the USB modem.

Since any USB modem installation will require Internet access to download the necessary proprietary drivers, as well as extensive configuration which is beyond the scope of this guide, all we can do here is to list the USB Modem models known to work with Ubuntu with links to the relevant installation instructions on the Ubuntu community help site.

The installation procedure of USB modems differs depending on the specific make and model of your modem. To identify model of your modem, Note the name and number on the front. Occasionaly you may have to look for a label to discover the exact model. Consult the list below to see which driver your modem requires and note the link.

When you go online to download the necessary drivers, you can access the relevant driver download links from the page with the installation instructions relevant to that model of USB modem.
1. Speedtouch modems:
https://help.ubuntu.com/community/UsbAdslModem/SpeedTouch
2. Modems using the Analog Devices Inc. eagle-usb I, II or III chipset (such as Sagem Fast 800, Comtrend ct 350 etc.):
https://help.ubuntu.com/community/UsbAdslModem/ueagle-atm
https://help.ubuntu.com/community/UsbAdslModem/EagleUsb
3. Connexant AccessRunner based modems:
https://help.ubuntu.com/community/UsbAdslModem/EciAdsl
https://help.ubuntu.com/community/UsbAdslModem/AccessRunner
https://help.ubuntu.com/community/UsbAdslModem/e-techV2

Dialup Modems

Most dialup modems are not supported by Ubuntu, but drivers can be found that will enable the use of such modems. First you need to identify what chipset your dialup modem is using:wget -c http://linmodems.technion.ac.il/packages/scanModem.gz
gunzip -c scanModem.gz > scanModem
chmod +x scanModem
sudo ./scanModem
gedit Modem/ModemData.txt

Read this file, it should list what modem chipset you have. Once you are aware of the chipset you have, see http://www.linmodems.org/ and follow the directions for your modem. More infomation can be found at SettingUpModems on the Ubuntu Wiki.

Monday, April 6, 2009

The RealPlayer install process


1. Download the RealPlayer11GOLD from http://www.real.com/linux to your home directory.
2. Open Terminal (from this point on, you must have admin rights).
3. Type sudo chmod +x RealPlayer11GOLD.bin
4. Type sudo "./RealPlayer11GOLD.bin"
5. Follow prompts. It'll start the installer. Do as it instructs and hit Enter.
6. It'll ask for the install path. Default is fine and hit enter.
7. It'll ask for a confirmation of install path. Press F to Finish the install.
8. It copies files, installs icons, etc. When you get the prompt, it's done.

Congrats! You have just installed RealPlayer 11 on Ubuntu. Easy, huh? ;)
To launch the app, go to Applications > Sound & Video > RealPlayer 11.
If that doesn't work, open Terminal again and type realplay .

Saturday, April 4, 2009

sudo dpkg --configure -a

problem :-
E: dpkg was interrupted, you must manually run 'dpkg --configure -a' to correct the problem.
E: _cache->open() failed, please report.

ANS:-1.
sudo dpkg --configure -a
apt-get update

sudo apt-get remove dpkg --purge

And:

sudo apt-get install dpkg


ANS:-2.
sudo dpkg --configure -a
sudo apt-get update
sudo apt-get upgrade

ANS:-

Installing Ubuntu inside Windows using VirtualBox

Installing Ubuntu inside Windows using VirtualBox 1. My new experiment about Ubuntu installation inside the windows using virtual box. ( Wo...